Photography 101: Master the Exposure Triangle (Aperture, Shutter Speed, ISO)
Introduction: What is Exposure?
Imagine your camera's image sensor is a bucket, and light is water.
Taking a properly exposed photo simply means filling this bucket with the exact right amount of water.
- Too little water The photo is too dark (underexposed).
- Too much water The photo is blown out and completely white (overexposed).
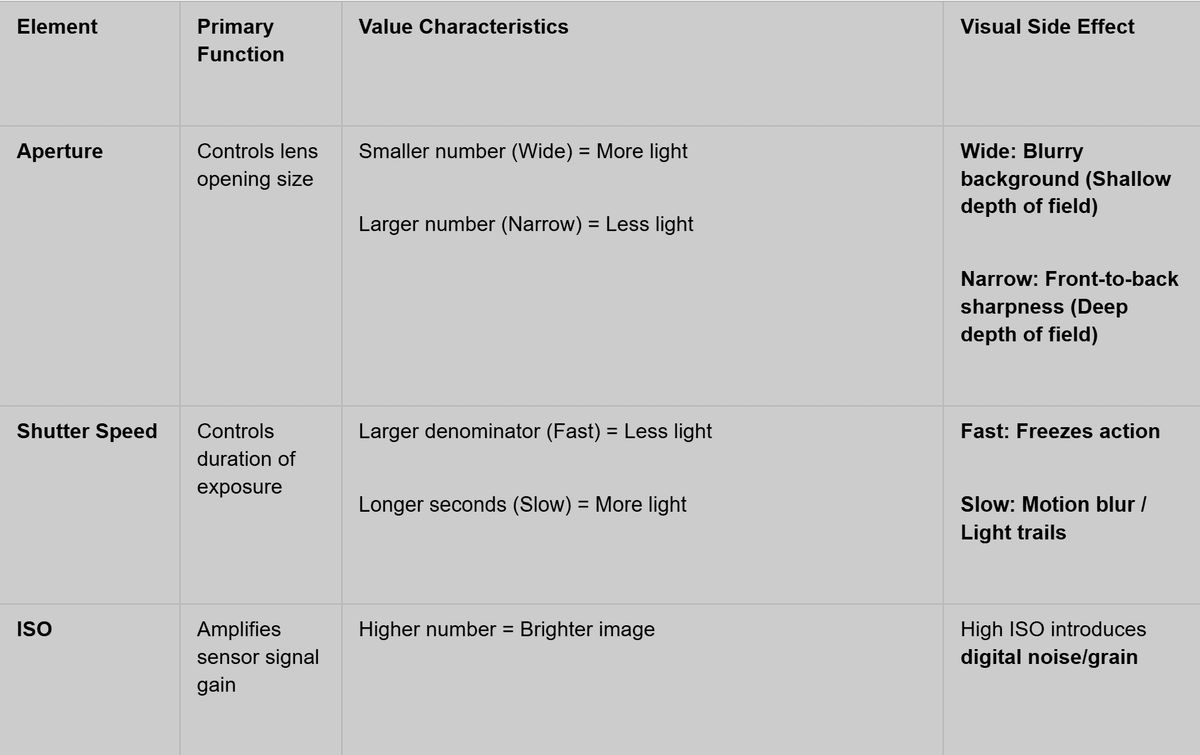
The three controls that regulate how much water enters the bucket are the core of photography: Aperture, Shutter Speed, and ISO.
Chapter 1: Aperture — How Wide is the Window?
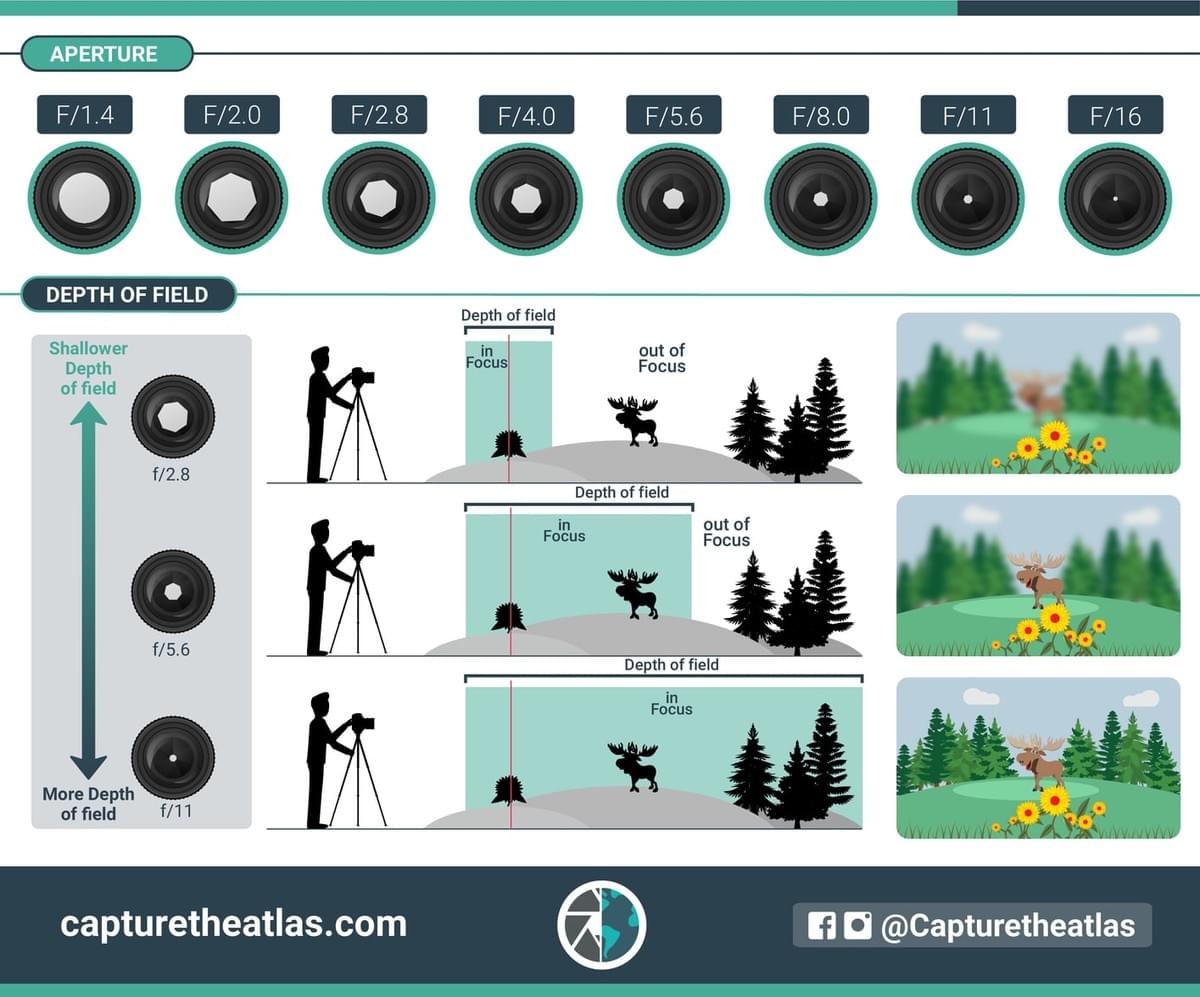
- Analogy: Think of aperture as a window. The wider you open it, the more light (water) pours in.
- Notation: Measured in f-stops (e.g., f/1.8, f/4, f/16).
- Crucial Beginner Note: Smaller number = Larger opening! (f/1.8 is a wide aperture; f/16 is a narrow aperture).
- Visual Effect (Depth of Field):
- Wide Aperture (e.g., f/1.8): Creates strong background blur (bokeh) while keeping the subject sharp. Perfect for portraits and food close-ups.
- Narrow Aperture (e.g., f/11): Keeps everything from foreground to background crystal clear. Ideal for wide landscapes and architecture
Chapter 2: Shutter Speed — How Long is the Window Open?
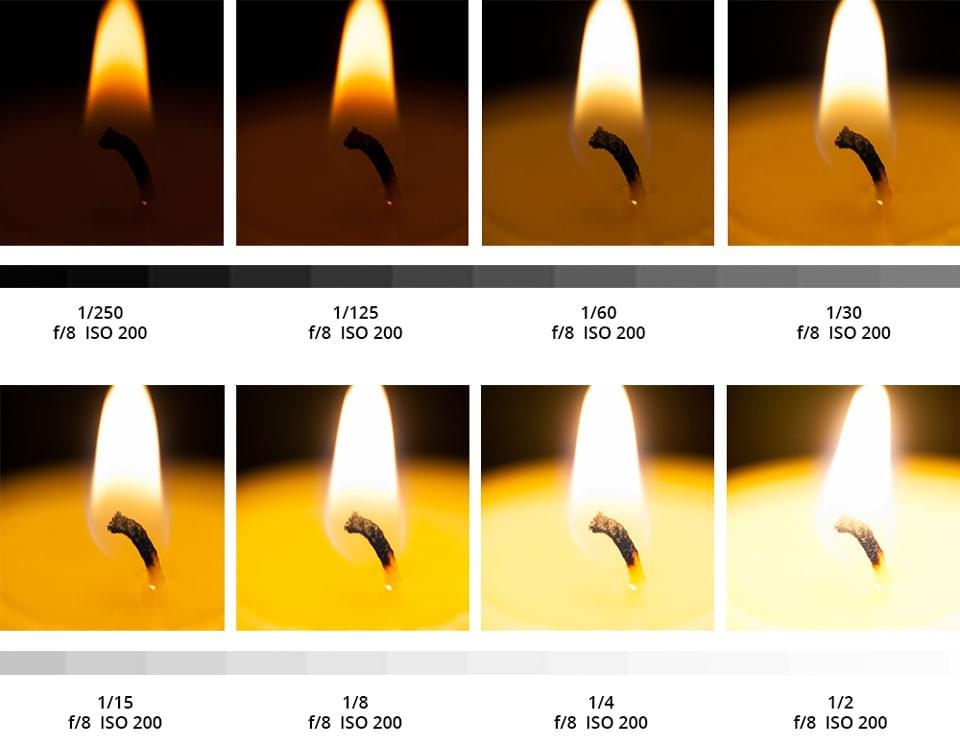
- Analogy: The duration of time the window remains open. The longer it stays open, the more light enters.
- Notation: Measured in seconds or fractions of a second (e.g., 1/1000sec, 1/125sec, 2sec).
- Visual Effect (Freezing Motion vs. Motion Blur):
- Fast Shutter Speed (e.g., 1/1000sec): Instantly freezes fast action—such as birds in flight, athletes, or splashing water droplets.
- Slow Shutter Speed (e.g., 2sec or longer): Captures motion trails, creating silky smooth waterfalls or light trails from moving traffic.
- Pro Tip (Safe Handheld Speed): When shooting handheld, dropping below 1/60sec often causes motion blur from camera shake. Use a tripod for slower speeds.
Chapter 3: ISO — Sensor Sensitivity to Light
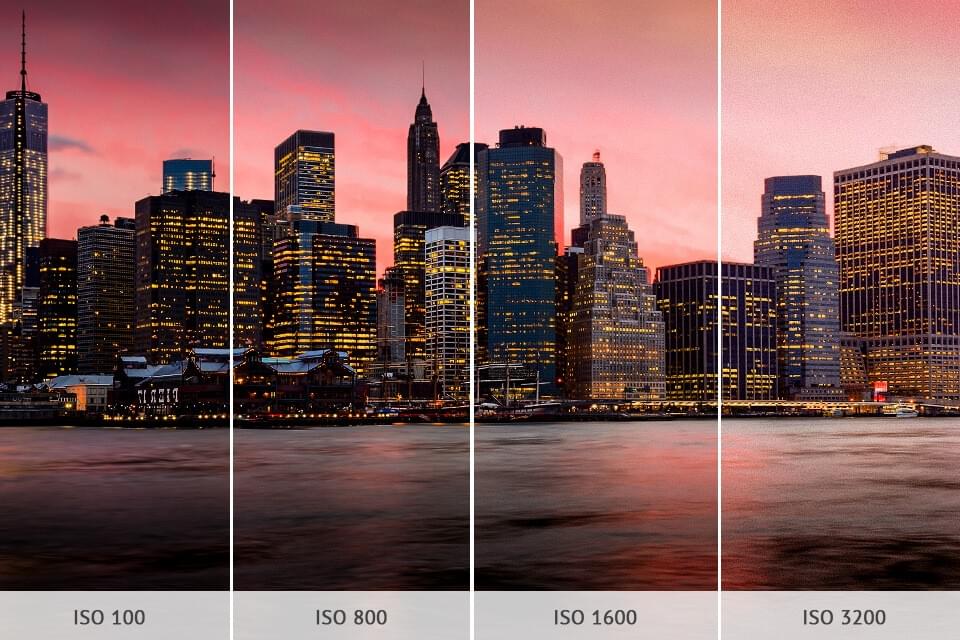
- Analogy: A digital "night-vision gain" or signal booster for your camera sensor.
- Notation: Expressed as values like ISO 100, 400, 1600, 6400, etc.
- Trade-Off (Digital Noise/Grain):
- Low ISO (e.g., 100–400): Produces the cleanest image quality and sharpest details (best for bright outdoor daylight).
- High ISO (e.g., 3200–6400): Brightens images in low light or dark indoor environments, but introduces rough grain/digital noise that degrades overall image clarity.
- Rule of Thumb: Keep your ISO at the lowest base value (such as ISO 100) whenever possible, and only raise it when you run out of available light.
[Intro: What is Exposure?]
Many people buy a nice camera, but end up leaving it on Auto mode forever.In this video, no complicated math or boring physics—just a simple 5-minute guide to mastering the Exposure Triangle.
Imagine your camera sensor is an empty bucket, and light is water.Getting a properly exposed photo simply means filling this bucket with the exact right amount of water.
Too little water, your photo is too dark. Too much water, your photo is blown out.
The three controls that regulate this flow of light are: Aperture, Shutter Speed, and ISO.
[Point 1: Aperture]
The first control is Aperture.Think of the aperture as a window.
The wider you open the window, the more light comes in.
Aperture is measured in f-stops.Here is the golden rule that trips up many beginners: The smaller the number, the larger the opening!
For example, f/1.8 is a very wide aperture, while f/16 is a very small aperture.
Besides letting in light, aperture controls your Depth of Field:A wide aperture like f/1.8 creates that creamy, blurred background—known as bokeh—which makes your subject pop. It is perfect for portraits and food photography.
A narrow aperture like f/11 keeps everything sharp from the foreground to the horizon, ideal for landscapes and architecture.
[Point 2: Shutter Speed]
The second control is Shutter Speed.This is the amount of time that the window stays open.
The longer it stays open, the more light enters the camera.
Shutter speed is measured in seconds or fractions of a second.For example, one-thousandth of a second is fast, while two seconds is slow.
Shutter speed is all about capturing motion:A fast shutter speed, like 1/1000th of a second, freezes fast action—like birds in flight, athletes, or splashing water droplets.
A slow shutter speed, like two seconds, creates motion blur—turning flowing waterfalls into smooth silk, or capturing stunning light trails from cars at night.
Just remember: when shooting handheld, try to keep your shutter speed above 1/60th of a second to prevent blurry photos from camera shake.
[Point 3: ISO]
The third control is ISO.Think of ISO as a digital night-vision amplifier for your camera sensor.
Under bright daylight, we always keep ISO at its base level, usually 100 or 200, which gives you the cleanest image quality and sharpest details.In low light or dark indoor environments, you can increase your ISO to 3200 or 6400 to make the image brighter.
However, higher ISO comes with a trade-off:The higher you push your ISO, the more digital grain—or noise—you introduce into your photo.
So the general rule is: keep your ISO as low as possible, and only raise it when you run out of light.
[Summary & Outro]
Let's do a quick recap:
- Aperture: Smaller number means a larger opening and a blurrier background.
- Shutter Speed: Faster speed freezes action; slower speed captures motion blur.
- ISO: Keep it low for maximum quality, and only raise it in the dark.
Photography is all about balancing these three elements.If you'd like to download a free cheat sheet or read the full breakdown, check out the blog post linked in the description below.
Switch your camera to Manual mode, give it a shot, and I'll see you in the next one!
🎯 Practice & Activity Time
Watching tutorials won’t make you a photographer—practice will! Grab your camera (or a smartphone with Pro/Manual mode) and complete these 3 targeted mini-challenges:
Challenge 1: The Depth of Field Magic (Aperture in Action)
- Objective: See firsthand how wide and narrow apertures alter your background.
- Steps:
- Place a small object on a table (like a coffee mug, a figurine, or a flower), ensuring there is at least 1 to 2 meters of open space behind it.
- Switch your camera to Aperture Priority (A/Av Mode) or Manual Mode.
- Stay in the exact same spot and take a shot using the widest aperture possible (e.g., f/1.8 or f/2.8). Notice the creamy background blur.
- Stop down your aperture to f/11 or f/16 and take a second shot. Observe how the background details suddenly snap into focus.
Challenge 2: Freeze Time vs. Motion Blur (Shutter Speed in Action)
- Objective: Master motion control using different shutter speeds.
- Steps:
- Find a moving subject (such as passing cars on a street, water running from a tap, or a running pet).
- Switch your camera to Shutter Priority (S/Tv Mode).
- Set a fast shutter speed (1/1000s or faster) to completely freeze the motion and capture sharp water droplets.
- Place your camera on a steady surface or a tripod, set a slow shutter speed (1/4s to 1s), and capture the smooth, silky motion trail for comparison.
Challenge 3: Low-Light Stress Test (ISO & Noise Balance)
- Objective: Discover the usable ISO threshold and noise tolerance of your sensor.
- Steps:
- At night, turn off the main room lights and leave only a dim desk lamp or bedside light on.
- Lock your aperture and shutter speed, then take a series of photos stepping up your ISO: 100, 800, 3200, and 12800.
- Import the images to your computer and zoom in to 100%. Inspect the shadow areas for digital noise/grain, and identify the highest clean ISO setting you are comfortable using.
💡 Homework Submission: Pick your favorite Before & After comparison set, share it on your social channels, or leave a comment down below with your takeaways!